Creating Workloads Using Login Enterprise Application XRay
July 25, 2021
Though the Login Enterprise Application XRay tool has existed since version 3…
the 4.5 version of Application XRay has exciting user experience enhancements, including a more accessible selection of UI objects.
This blog will include some brief getting started tips. Follow along to truly absorb the ease-of-use knowledge and power using the Application XRay (“XRay”) tool.
For simplicity, this guide will be targeting the built-in Windows Notepad.exe app as an example, but we also support making workloads against web GUIs/apps. Refer to the bottom of this blog for links to further informative reading.
Download X-Ray
You can download the X-Ray from the Applications page of the Login Enterprise web GUI either under the Script Editor or the Scripting Toolset
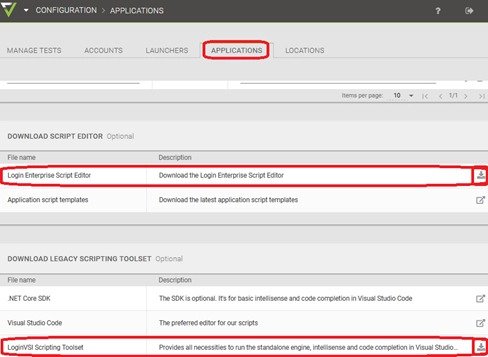
Once it is downloaded, X-Ray will be located at \ScriptEditor\xray\ApplicationXRay.exe or …\ScriptingToolSet\ApplicationXRay\ApplicationXRay.exe, respectively.
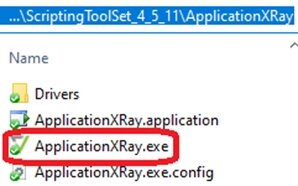
Open X-Ray
If opening via Script Editor, ensure the Script Editor is running, click on the Application X-Ray button to launch it.
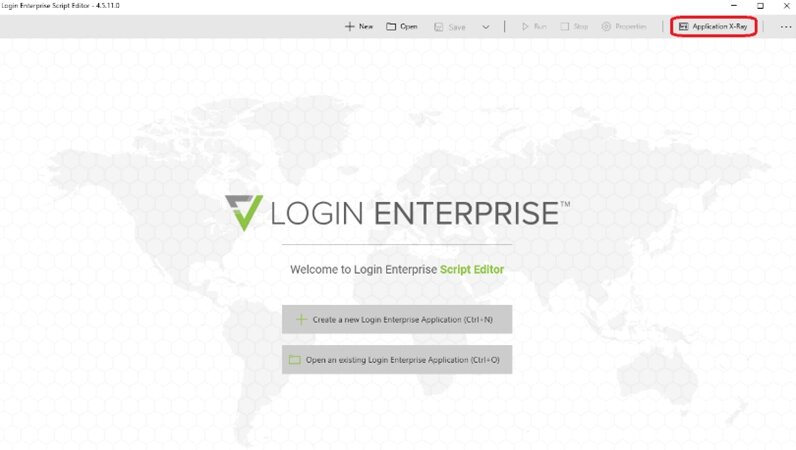
Observe the X-Ray GUI to become familiar.
Open the application you want to make a workload for either 1) manually or 2) let X-Ray launch it for you
1) (manually) Open the app of your choice, then bind the Application X-Ray to your app by clicking the Select App button, hovering the mouse pointer over the UI of the app (observe the yellow border around it indicating detection), and click on it to select it.
Observe X-Ray will automatically gather the metadata of the window/process, which can ensure the correct window has been selected, or 2) (using X-Ray launch) put in the full command-line string to invoke your app, including any command-line arguments, in the Commandline field of X-Ray, then click the Start button.
This will invoke your app, wait for the UI to appear, then populate the app’s main window’s metadata into the X-Ray automatically (Title, Class, and Process Name).
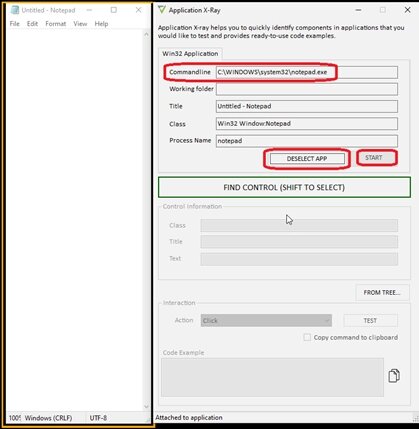
Now we’re ready to capture the application interactions step-by-step!
Invoke X-Ray’s object finding ability.
Click on the FIND CONTROL button in X-Ray.
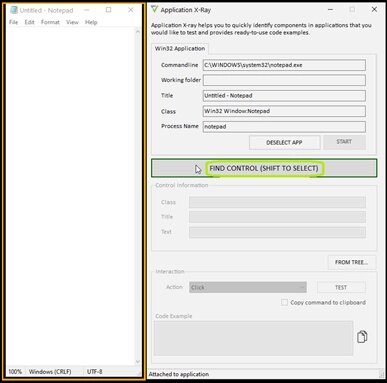
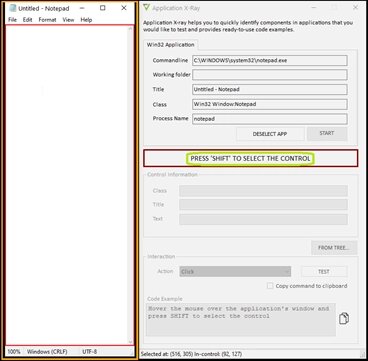
Select the object in the App’s UI to detect or interact with
With your mouse pointer, hover over the desired object/control in the app’s UI. This could be a pane, button, field, radio button, popup, drop-down menu, combobox, checkbox, etc. Note the red border that will occur over the hovered-over object. Press Shift on your keyboard once the red border is encapsulating the desired object. In my example I’m hovering over and selecting (pressing Shift key) the main text editor pane in Notepad.exe.
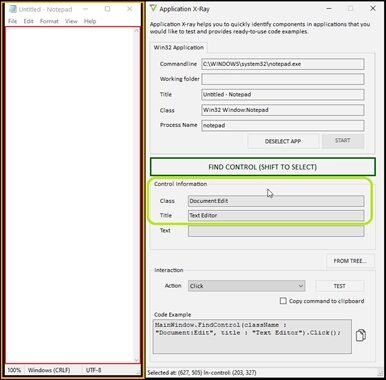
Observe the selected object’s metadata to ensure proper object selection
Once Shift is pressed, the mouse pointer will automatically snap to the center of the X-Ray UI for convenience.
Look in the Control Information pane. This will show the auto-populated metadata for the object. Ensure this contextually looks correct.
In my example, I see Document: Edit and Text Editor for the class and title of the object, respectively. This seems like the desired selection, contextually, for my intent and purpose of this demonstration.
Also, notice there is already an automatically-concatenated “code snippet” in the Code Example field.
Technically, this is already syntactically accurate code that our workload language (based in C#) can successfully execute; it can be used by a test user driving synthetic and automated interactions. (More on this later)
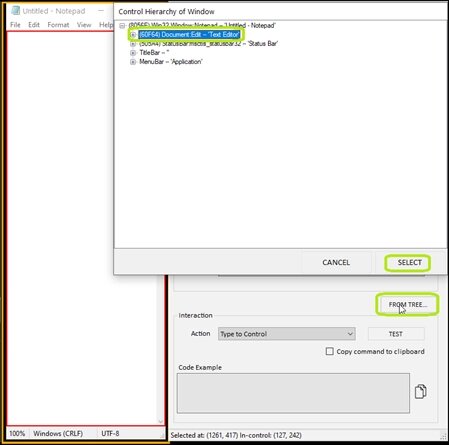
Ensure proper object selection by looking at the app’s UI control hierarchy (optional step)
If you want to make sure you’ve selected the correct object in the app’s UI, then click on the FROM FREE button.
This will open a popup that shows the object hierarchy in the app’s UI and can be drilled down into by expanding sections via the plus (+) buttons. Look for contextual metadata for that control. In my example, I have Document: Edit – ‘Text Editor’ selected. In my intent and purpose of this demonstration, this is contextually accurate. (I’ll be synthetically typing to the text editor in the following steps).
Just keep in mind object classNames will usually have something indicating what type of control it is. For example, text fields’ classNames will normally be some version of the “Edit” string.
Simulating interactions with the selected object
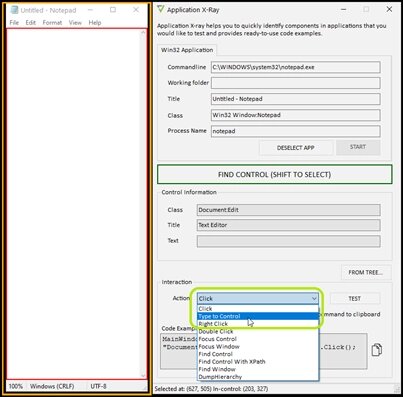
In X-Ray’s Action drop-down menu, select the desired functionality you want to smoke test against the selected object. This can vary from finding it to clicking on it, to typing to it, etc. In this example, let’s select Type to Control.
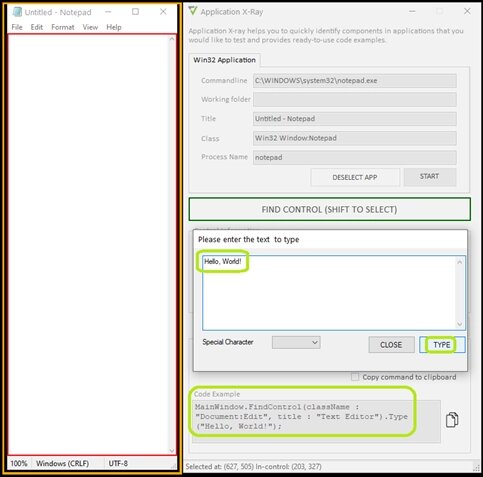
Send some keystrokes via the TEST button (Or otherwise, interact with the object.)
Click on the TEST button in the X-Ray’s GUI. This will pop up a “Please enter the text to type” window. In the text field of the popup, type in “Hello, World!”. Click on TYPE. This will execute the function.
Observe the function. TYPE (“Hello, World!”) has been dynamically appended to the end of the code snippet statement.
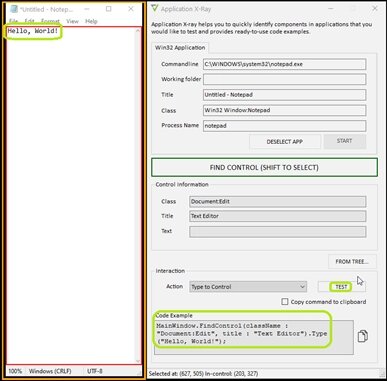
Verify the simulated action was successful
Observe in the Notepad.exe text editor pane that “Hello, World!” It has been synthetically typed out.
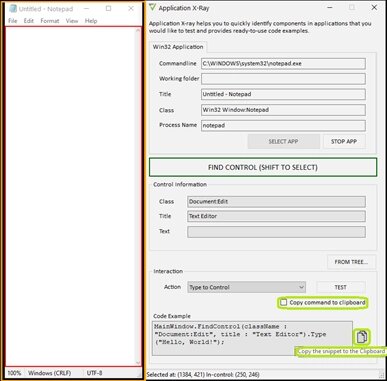
Copy the working Code Example to the Script Editor
If desired, since we’ve now smoke tested this functionality successfully, this concatenated Code Example snippet statement can be copied and pasted to the Script Editor app for further programmatic execution and testing, placed where it makes sense in the script you’re writing.
To copy the Code Example into your clipboard, either click on the collated pages icon/button or click on the “Copy command to clipboard“ checkbox and re-run the command (TEST button).
Run the workload script to validate this function’s addition to the full workflow/script
In my example, I’ve added the Hello, World! Typing functionality after the app START() function, but before the app STOP() function. When I run the script, I can see the programmatic (hands-off) Notepad.exe launch, Hello, World typing, and finally, the Notepad.exe closure.
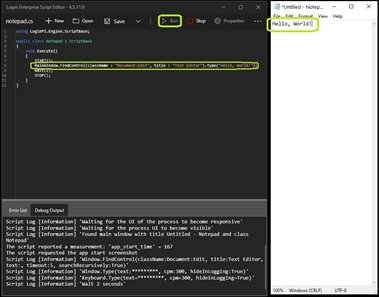
We can now deem this process a success! Now you can rinse-and-repeat with finding more objects in the app to interact with, playing around with the different actions to find the correct action for the desired result, and copying this code to the Login Enterprise Script Editor to incorporate in the grander workload/workflow simulation.
Now you’re equipped to continue customizing the workload, upload it and run actual tests with it, or create your workload against a critical application-under-test!
Please read the following to fill in any workload scripting knowledge gaps.
For further information on:
- Uploading and testing with your shiny new workload, refer to Applications
- Downloading and accessing the Application X-Ray tool, please refer to Login Enterprise Script editor (The Login Enterprise Script Editor is Login VSI’s self-contained IDE/ISE)
- Scripting for a desktop app workload refers to The Application XRay 4.5. and later: Win32 Application Functions Explained
- Scripting for a web browser/web app workload refers to The Application XRay 4.5 and later: Web Browser Functions Explained
- How to create an initial workload against a desktop app refer to Tutorial: Creating your first application script
- How to create an initial workload against a web browser/web app refer to Tutorial: Creating your first Web Browser script
- Scripting functions, syntax, and parameters refer to Login Enterprise | Scripting Functions
- Business tips and considerations to take before starting workload scripting refer to Application Script Creation Guide
- Other helpful workload scripting documents, please visit: Application Customization
Our complete collection of Login Enterprise documentation is available here.
For further technical, support, or services information, reach out to support@loginvsi.com.
Workload Templates
